

How To Display Image On Facebook For Blog Post
I see this question every day on the Facebook group of l'Académie du Blogue: how to change the image that Facebook shares when sharing an article, how to change facebook link thumbnail? Or, how to modify the image that Facebook uses when we share the link to the home page of our blog?
I will answer once and for all these questions related to images posted on Facebook!
For all the instructions that follow, I assume you have the Yoast SEO plugin installed on your blog. That's what I'm going to use to edit our images in one!
How to tell Facebook which image to use for your home page
To do that, I remind you that you must have the Yoast SEO plugin installed.
- In the left pane on your WordPress dashboard, click on "SEO," then 'Social."
- For the "Frontpage settings" section, click on "Upload" and upload the image you want to use. It is recommended that your picture is around 1200×630 pixels. If that's not your case or you don't know the dimensions of your photo, read the last section of this blog post.

- You can also change the title of your blog as it will be displayed on the Facebook preview, as well as write a Facebook description that will be shown when you share your blog!
- For the "default settings" settings, you can upload the image for the second time. She will now be used if Facebook doesn't find any picture to represent one of your blog posts, there will be a default one.
- Click on Save
- Go to the section "Let's test that our changes have worked" below
How to tell Facebook which image to use for a specific post
When you share an article on Facebook, is not the right picture displayed? Follow the steps below to correct this problem!
- Edit the article that causes you problem
- At the very writing section, go to the section for Yoast.

- Click on the social media sharing icon, framed in blue below

- You can now add the title you want Facebook to use, a description as well as the image you want to use!
- Save the changes to your article, and voila!
- Go to the section "Let's test that our changes have worked" to make sure everything is perfect for the next time you share your blog on Facebook
Let's test that our changes have worked
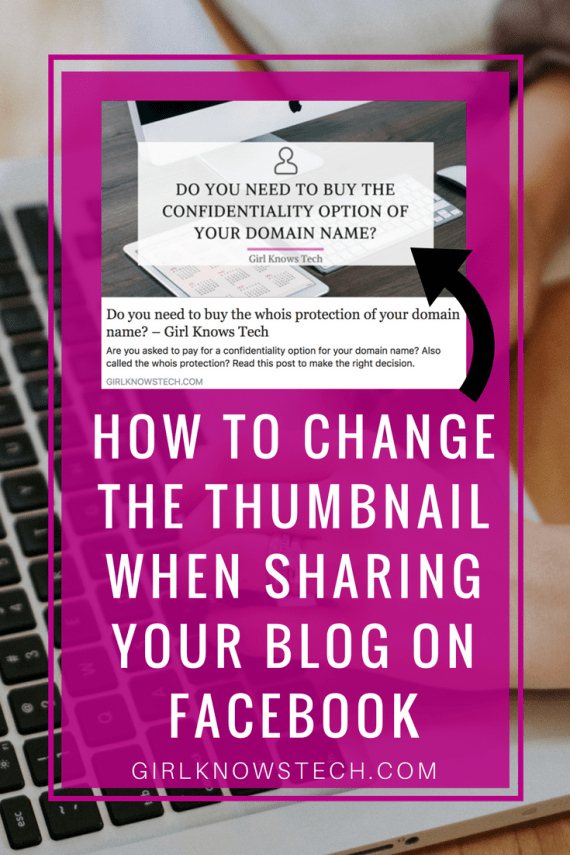
- Go to the Sharing Debugger of Facebook
- Enter the address of your blog, then click on "Debug"! You should see your new image displayed as shown in the screenshot below. If this is not the case, click on "Scape Again" a few times, it may take a few clicks to work for good!

- If you still do not see any changes to your image, you may need to clear the expired cache from your WordPress blog, especially if you are using a cache plug-in. For me using WP Super Cache, I had to go to "Settings> WP Super Cache> Remove Cache> Delete Expired Cache. Then, I went back to the Facebook debugger, and two clicks later on "Scrape Again," my changes were well displayed!
Your image does not fit in the Facebook preview?

Here is an example of an image that you would tend to want to change. Felicia's blog logo is not displayed in full! Here's how to resize an image on a mac:
If you are on a Windows computer, this website offers a detailed step-by-step guide!
If you want to resize the displayed image:
- We will have to resize your image to make 1200×630 pixels, the recommended dimensions!
- If you have a Mac, you can double-click on your image; select Tool > Adjust Size…

- Well, that's where it gets a little more! 😉 Your image will probably not be precisely 1200 by 630 pixels because the tool will try to keep your ratio of size and length of your image so that the image does not look any distorted. Adjust your picture in the best possible way to get closer to the size you want! The image must have a minimum of 200 x 200 pixels.

- Save your new image; you can now use it in the steps above!
Conclusion
I hope I have been able to answer all your questions about the featured images used by Facebook! If you have other questions, feel free to write me a comment so I can help you!

Marie
Marie likes to push her limits and always keep learning new things. She shares her weekly learnings because "if you can't explain it simply, it means you didn't understand it well enough".
How To Display Image On Facebook For Blog Post
Source: https://girlknowstech.com/change-facebook-link-thumbnail/
Posted by: carpenterhices1941.blogspot.com
0 Response to "How To Display Image On Facebook For Blog Post"
Post a Comment